
QR Code Not Scanning? 12 Practical Fixes

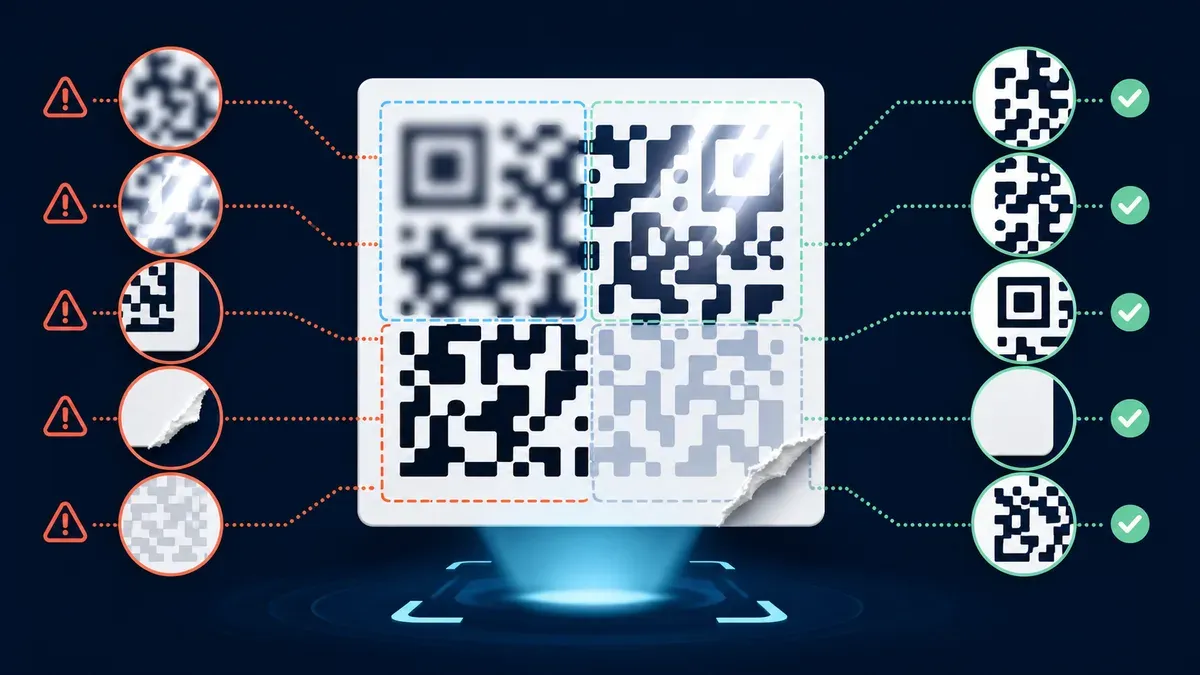
When a QR code will not scan, the cause is usually the image, the printed code, the camera environment, or browser permission—not the act of scanning itself. Work through the checks below in order, changing one condition at a time.
1. Clean the lens and hold steady
A fingerprint on a phone or webcam can soften the small modules enough to prevent detection. Clean the lens, hold both camera and code steady, and wait for autofocus. Move back slightly if the camera cannot focus at close range.
2. Make the code larger in the frame
The scanner needs enough pixels to distinguish every square. Bring a printed code closer without exceeding the focus distance, or zoom into a code shown on a website or PDF before taking a screenshot. Do not use digital zoom on an already blurred photo and expect missing detail to return.
3. Keep the complete quiet zone
A QR code needs a clear margin around its edges. Cropping tightly, placing text against the code, or printing it to the edge of a label can confuse detection. Reframe the camera or recrop the image so all four sides and their blank margin remain visible.
4. Improve contrast
Dark modules on a light, plain background are the safest choice. Similar colors, transparent backgrounds, textured paper, gradients, and inverted colors may reduce reliability. If you control the design, test a conventional high-contrast version. Our guide to creating scannable QR codes covers design and print choices.
5. Remove glare and shadows
Reflections on screens, laminated cards, glossy packaging, and curved surfaces can hide important parts of the code. Change the viewing angle or move the light source. Use even, diffuse light and avoid casting the phone’s shadow across the symbol.
6. Straighten the view
Moderate perspective can be corrected, but an extreme angle stretches modules and may hide parts of the code. Face the camera toward the center and keep the code as flat as possible. Flatten wrinkled paper without covering it.
7. Use a sharper source
Repeated screenshots, social-media downloads, and messaging compression can damage fine detail. Find the original file, increase PDF zoom, or take a new photograph. When scanning a saved file, follow the image scanning checklist.
8. Check for physical damage
QR error correction can tolerate some missing information, but not unlimited damage. A tear, fold, sticker, stain, or large logo may cover essential modules or finder patterns. Try another copy of the code or ask the issuer for a replacement rather than attempting to reconstruct sensitive data.
9. Grant the correct camera permission
For webcam scanning, the browser must be allowed to use the camera. If permission was denied, open the site’s permission controls, allow camera access, reload the page, and start scanning again. Also check operating-system privacy settings.
If another meeting or camera app is active, close it. Select the correct camera when several devices are listed. Image upload remains available when a camera is blocked.
10. Use HTTPS or localhost
Modern browser camera APIs require a secure context. A production scanner should use HTTPS; during local development, localhost is normally treated as secure. Opening a development server through an ordinary http:// LAN address may allow the page to load while camera access fails.
This requirement affects live camera capture, not the ability to choose an existing image.
11. Update or change the browser
Old browser engines, restricted in-app browsers, disabled JavaScript, extensions, or enterprise policy can interfere with camera access and image processing. Try an up-to-date mainstream browser, reload without conflicting extensions, and ensure JavaScript is enabled. Private browsing can also use different permission rules.
12. Confirm that the code itself is valid
If several devices and clear images all fail, the source may be incomplete or incorrectly generated. Test the original digital file at multiple sizes before printing. If the code decodes but the URL no longer works, scanning succeeded—the destination is the separate problem.
Print versus screen problems
For print, check that scaling did not make the modules too small, ink did not bleed, and the quiet zone was not trimmed. Avoid folds and curved placement near seams. Test the exact printed output rather than only the design file.
For screens, raise brightness moderately, remove display glare, show the entire code, and avoid animated overlays. A screenshot upload bypasses camera moiré and reflections and is often the best fallback.
Diagnose the problem with one controlled test
Use a known-good, plain QR code under the same conditions. If the test code scans, the original code or image is the likely problem. If neither scans with the webcam, switch to image mode using a clear screenshot. If image mode works, focus on camera permission, focus, lighting, or secure-context requirements. If image mode also fails for known-good files, try a current browser and reload the page.
This comparison is more useful than changing several settings at once. Record what changed—source image, distance, light, browser, or device—so you can reproduce the successful condition. For an important printed campaign, test multiple ordinary phones and browsers before distributing the material.
When to ask the issuer for a replacement
Stop troubleshooting and contact the source when the code is cropped in the original document, its central or corner areas are substantially covered, a ticket appears expired, or the decoded destination is clearly wrong. The issuer can provide a new digital copy, confirm whether a code is single-use, or verify the intended address.
Do not use online image reconstruction tools to guess missing portions of payment, authentication, access, or ticket codes. A visually plausible reconstruction can decode to different data. For security-sensitive uses, only an authorized replacement is appropriate.
Prevent the problem before publishing
Keep a vector or high-resolution master, preserve the specified quiet zone, and avoid resizing a raster code repeatedly. Test at the final physical size and on the final material, since ink spread, lamination, curvature, and viewing distance affect performance. Test the destination separately and use a maintained URL when the code will remain in place for a long time.
For screens, confirm the code stays visible long enough, is not covered by consent banners, and remains large enough at mobile and desktop breakpoints. Recheck after redesigns, PDF export, email compression, and print-provider processing.
Privacy and security after a successful scan
Fixing recognition does not make the decoded content safe. Inspect the domain, be cautious with shortened URLs, and avoid entering passwords or payment details on an unverified page. Our QR code security guide explains common red flags.
Web QR Scan processes camera frames and selected images locally for recognition; they are not intentionally uploaded to our server for scanning. Stop the camera when finished.
Frequently asked questions
Why does my camera recognize some QR codes but not one specific code?
That code may be too small, damaged, low contrast, over-styled, incomplete, or invalid. Compare it with a plain, high-contrast test code under the same conditions.
Can I repair a blurry QR code?
Sharpening may improve a slightly soft image, but it cannot reliably recreate missing modules. Obtain the original or take a better photo.
Why does the camera work on the live website but not a local network URL?
The live site uses HTTPS. A plain HTTP LAN address is generally not a secure context, so the browser may block camera APIs.
Why does the code scan but the link fail?
The QR code was decoded successfully. The website may be offline, expired, moved, or blocked; contact the code issuer rather than repeatedly rescanning.
Should I install another scanner?
Not necessarily. First try image upload, better lighting, a supported browser, and the permission checks above. Installing an app cannot restore a damaged source.
Try again with a clean source
Open the free QR scanner, choose webcam or image mode, and apply the relevant fix. Verify the decoded result before following it.